How to install POS-VIDEO? – Here you find important installations items to install the POS-VIDEO card oder Software in your Windows Computer. With POS-VIDEO you can uncover embezzlement on your cashregister.
To install the POS-VIDEO System you need follow things:
- Powerful Hardware (see requirements)
- Software (DVR-Main.exe, DVR-NET Client for Windows, CMS-Software if you have more then one Videoserver from POS-VIDEO, App DIVIS DVR VIEWER for Android/iOS (even IP-CAM Viewer App works for live cameras with the DVR Type TECVOZ MPEG4 DVR)
- Cameras, You need ONVIF Network-Cameras (without PTZ-function) or for the Hybrid-System coaxial Cameras (Coaxial Cameras will be supported every videotype system: Analoge, AHD, TVI, CVI, HD-SDI, Ex-SDI – even Pelco D/P PTZ coaxial cameras will be work)
Hardware requirements for POS-VIDEO
To install the POS-VIDEO NVR-Software you need follow hardware system (Q2/2022)
- INTEL i5 CPU or Intel i7 CPU if you need more then 5 cameras (for using 1-4 Cameras, a i5 CPU is enough). Make sure your CPU supports Directx11 or the software wont display any cameras
- ASUS Mainboard with serial interface, VGA/HDMI like the PRIME H310M-D/CSM (Micro-ATX Board)
- 8 GB RAM or more
- Microsoft Windows 10 Pro 64 Bit, (Windows 11 Pro also works) – Please do NOT use the Windows Home Edition
- SSD (e.g. Samsung Evo 870 with 500 GB) for Windows and Programm installation. Make two partitions: C://Windows with 250 GB and D://Databackups even with 250 GB
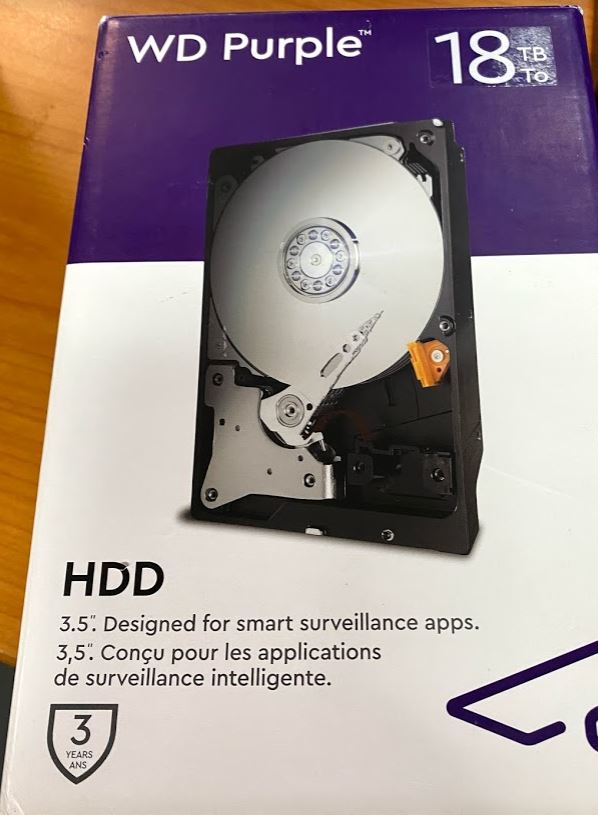
- Western Digital Purple 4000 GB Videosurveillance harddrive.
- If you need more then 1 cashregister, please use a 2 or 4 COM-Port PCIx Card
- If you need more security in your network, please install a second LAN-Ethernet PCIx card (so the camera network is separately of the Videoserver IP-Address).
- If you have no possibility to install a serial cable from the Videoserver to the cashregister place, so use the Exsys EX-6030 – Ethernet to 1x Serial RS-232 Adapter.
Additionally, if you want to use our remote installation support:
- Please install the Remote Support Software like www.teamviewer.com or the new version of www.VNC.com (there is now a P2P connection possible. For five devices and private use is the VNC Account for free (1 device is the videoserver, 1 device your smartphone, 1 device your notebook…)
- After you get the USB-Dongles we help you to install the NVR-Software. We will make a Teamviewer session and a Zoom-Meeting to train your technicians people.
Windows settings before you install the POS-Software
- Install Windows 10 Professional (English) on the SSD on drive c:\
- Make the Windows Username to: video (without Password)
- Make a C:\ and D:\ partition on the SSD (50% for C:\ Partition and for D:\ the rest of the SSD). Make the follow name for the C:\ = Windows and D:\ Partition = Backups
- Windows should be installed on SSD with drive C:\ for Windows/programs and the remaining space can be used for a D:\ drive, used for backups. The 2nd hard drive should have 4TB or more and will be used for the recordings.
- Make the partition V:\ with the name = Videos on the 2nd harddisk. – Please use the Western Digital Purple harddisk series. (Special harddisks for video surveillance).
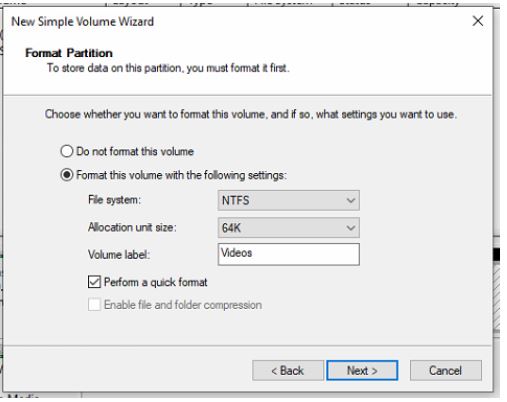
- Format the V:\ harddisk with NTFS and select the maximum size format of allocation units, where is possible to select in the dropdown menu. Here you see 64 KB, but in real is more possible to select. Use the highest entry, where is possible to select in the dropdown menu.
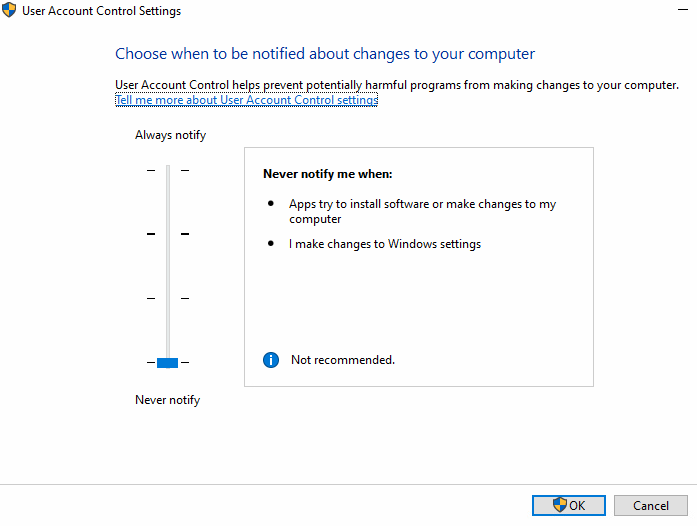
- Make the user rights control in Windows to the lowest level. To open it, klick on Windows start button and type UAC. After changing the user rights, reboot the system.
- Name the Computer to follow name: Videoserver
- Deactivate the start helper menue. Command Windows CMD (Administrator-Modus) and type in: bcdedit /set {default} bootstatuspolicy ignoreallfailures
- Deactivate the Windows Defender
- Make follow entries in the local Firewall (both directions).
TCP 3000, 3001, 3003, 3007, 8800 (if you want to use Audio-Microphone), 80 (if you want to use the internal webserver to access to the system. - Download all Windows Updates. After downloading, deactivate in the Regedit (extra tools available) the Windows updates and notifications.
- Win10 Update deactivation: Go to “HKEY_LOCAL_MACHINE\Software\Policies\Microsoft\Windows”. If it doesn’t exist, create the “Gwx” key. To do this, right-click the “Windows” key – the icon that practically looks like a folder in Windows Explorer. Then select “New” and “Key” and as mentioned give it the name “Gwx”. Click on the new key (“folder”). Inside, create a “DWORD” entry named “DisableGwx” and give it the value “1”. Then restart Windows.
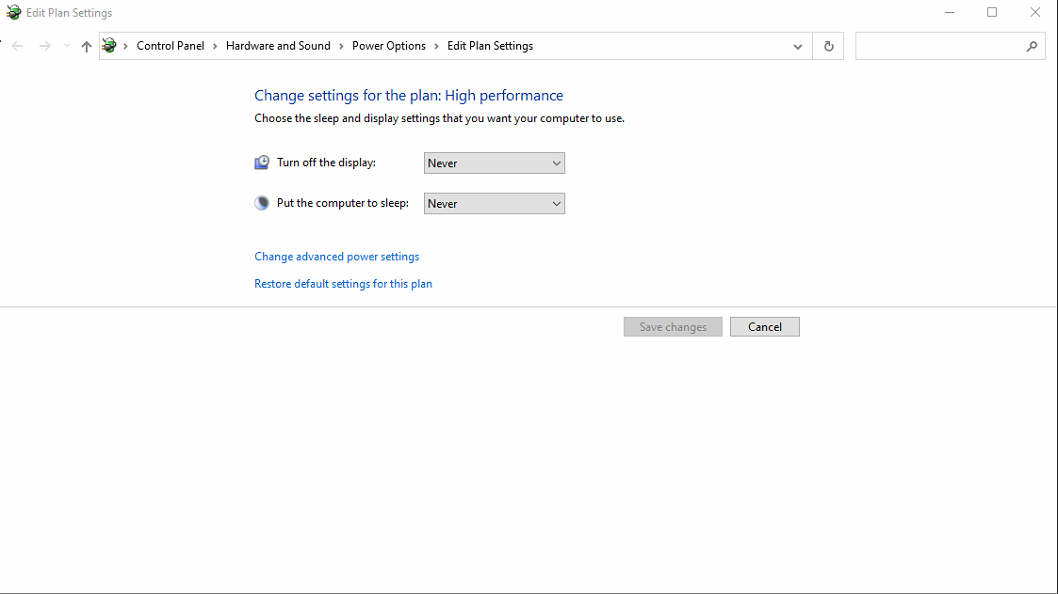
- Go to advanced system settings and make the entry: maximum power
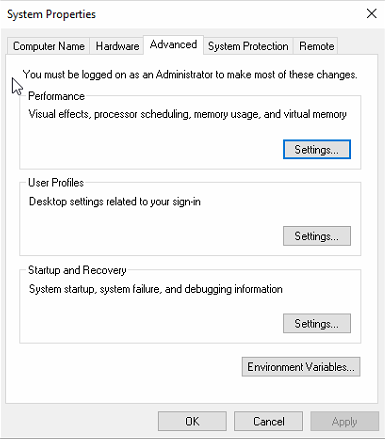
- Even in the advanced system setting (Click Windows Start Button and type advanced system stettings: Performance/Advanced/Change/Turn off paging file, let system manage size on
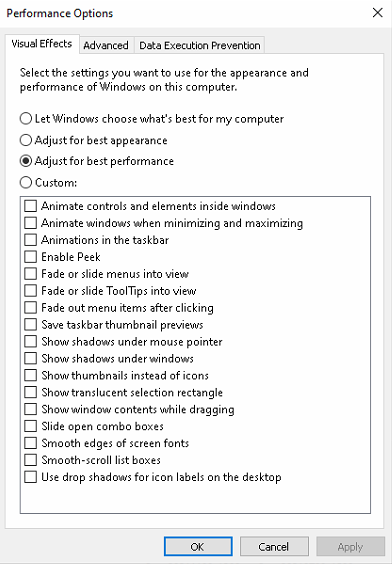
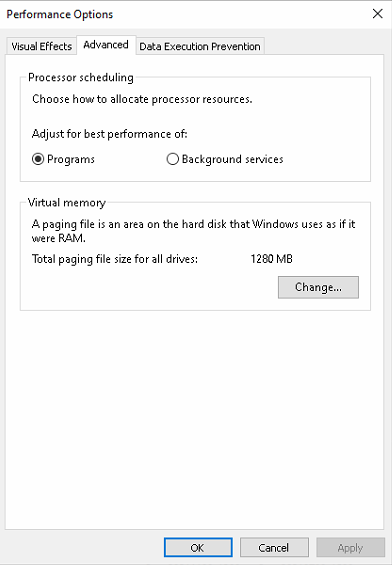
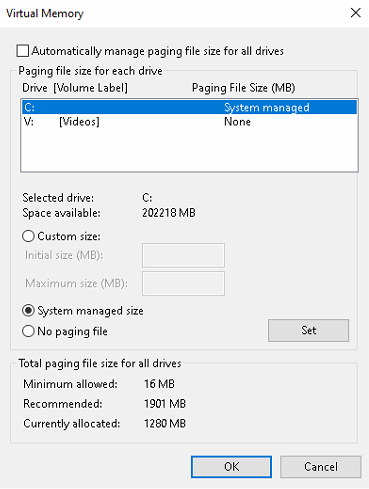
- Windows Explorer settings: Extras folder options, view, show known file types
- Energy saving: the screensaver or energy save mode must be set off. Use high perfomance power in the energy settings.
Install the POS-VIDEO Software
- Download our software, if you dont know how, contact support[a]alpha11.de
- Connect the USB-Dongle (without the USB-Dongle ist the installation impossible. You have to order the USB-Dongle beforehand)
- After Windows installation please proceed with the windows setup. The main user should always have the following name: video (without password) If a password is mandatory for the customer, an automatic login must be set in the video software in the settings under system. – Enter the Windows user and the password for the Windows login there.
- Copy pos-video-software.zip to Library-DOCUMENTS directory. You only get this after buying the license from us. The content of the pos-video-software.zip is as follows:
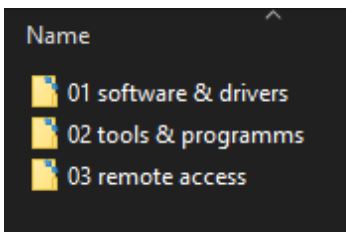
01 software & drivers: Includes all the files needed fort he software installation and various drivers
02 tools & programms: Has everything needed for setting up the windows surroundings and add additional features to the pos-video-software
03 remote access tools: like Teamviewer Host or VNC: Withing youll find the programm used for remote access, so we can help in case of needed support
6. In order for the software to recognise the USB-dongle-licence, install the two drivers for the USB license pos-video-software\01 software & drivers\usbdriver
7. Then head over to the bin-folder (video-software\01 software & drivers\bin) and open the SetupDisc.exe, now click on „NVR S/W Install“

The installer will prompt you with two requirements, click on „Install“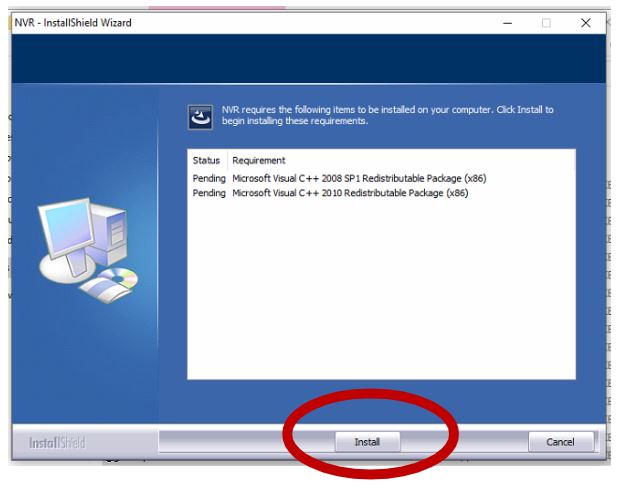
8. Choose the proper media format (NTSC or PAL) and continue by clicking „Next“. NTSC in North and part of soth America and Japan. PAL in Europa, Asia, Africa, Australia.
9. USER NAME: Enter a username for Administrator
PASSWORD: Enter a password for Administrator
Confirm PW: Confirm the password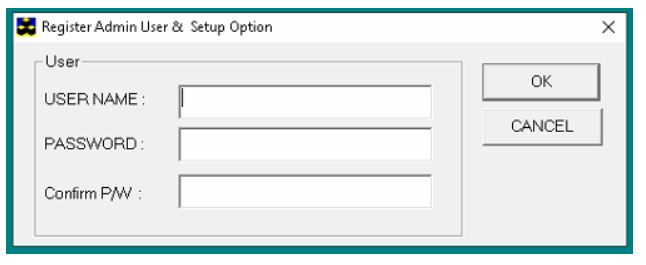
Take care – very important: If you lost your Administrator Password, you have no access again to the system and you have to install the Videosoftware again.
10. If you have installed the software correctly, there should be three shorcuts on your desktop.![]()
11. Open the „DVR Setting“ program and login with your new created user
12. At first the disk space hast o be alllocated in order to save the surveillance footage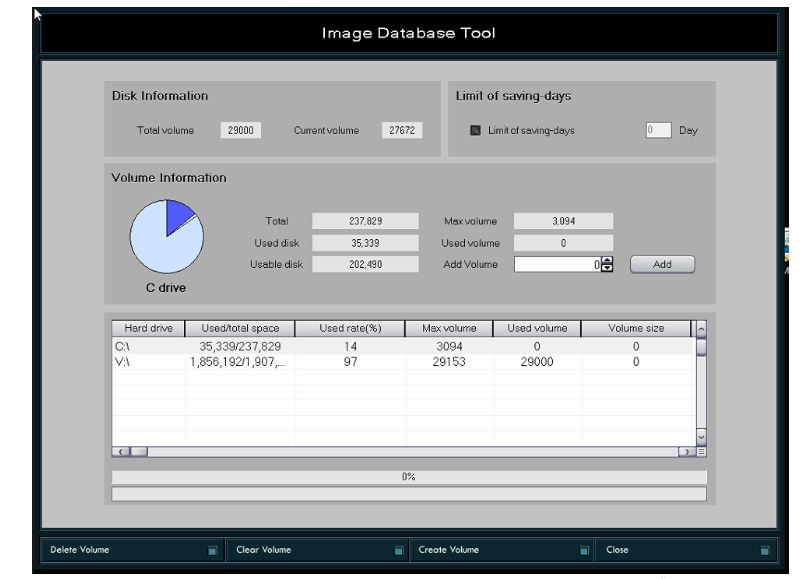
Click on the hard drive that will be used for recording and in the upper „Add Volume“ field, type in around 500 less than the „Max volume“. When done, click on „Create Volume“ and wait until the volumes have been created.Click on „Close“. On a 4 TB harddisk it takes around 15-20 Minutes to create the volumes.
13. Next go in to the „System“ section.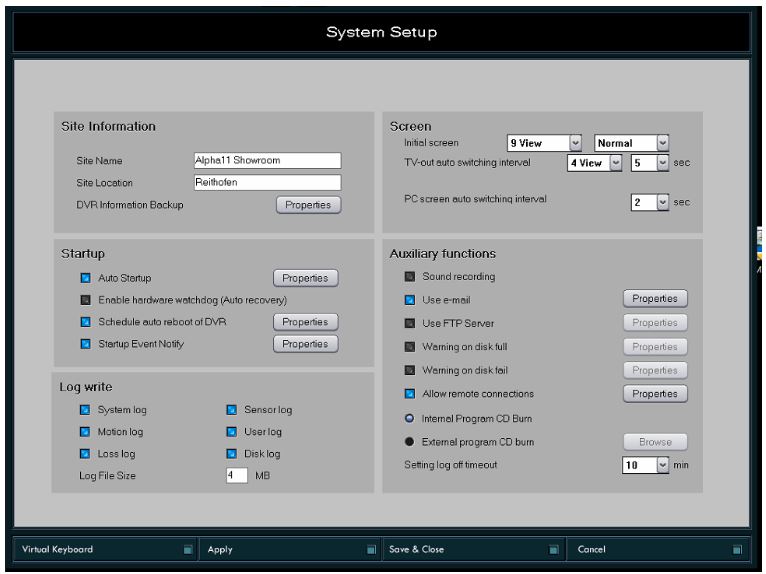
Here you can type in the Site Name and Site Location, as well as enable Auto Startup.
This will ensure that the software starts on windows startup. You should also enable the auto reboot every Wednesday on 01.00 AM
14. Activate „Use e-mail“ on the right side and click on „Properties“
Now type in the information that you got from your internet service provider.
(NOTE: this is just an example, do NOT use this!)

15. Now setup a notification for the server restart, click on „Properties“ next to „Startup Event Notify“
When ur done, click on „Save & Close“
16. In ordert to use IP cameras, we need to install the IPCamera_v1.04_AH1.04.4.exe (pos-video-software\02 tools & programms).Select ALL cameras when asked.

17. Open up the „DVR Settings“ again and click on „Camera“
Here you can give the cameras names & choose various settings for them. Most importantly we need to setup the connection the IP camera.
Click on „Properties“ to change the camera settings within the software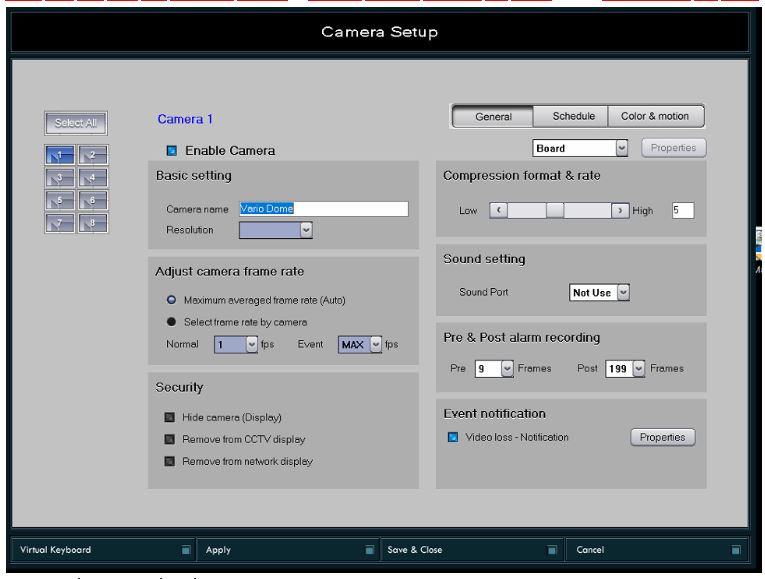
NOTE: Only use H264 Stream, H265 is not supported. Connect IP cameras over the ONVIF protocol. (ONVIF PTZ-Cameras will not be supported, HD-AHD/SDI PTZ Cameras will be supported on the Hybrid-DVR-System, if you will use the DVR-Videocards)
18. Head over to „Schedule“ and decide when you want your cameras to record and how.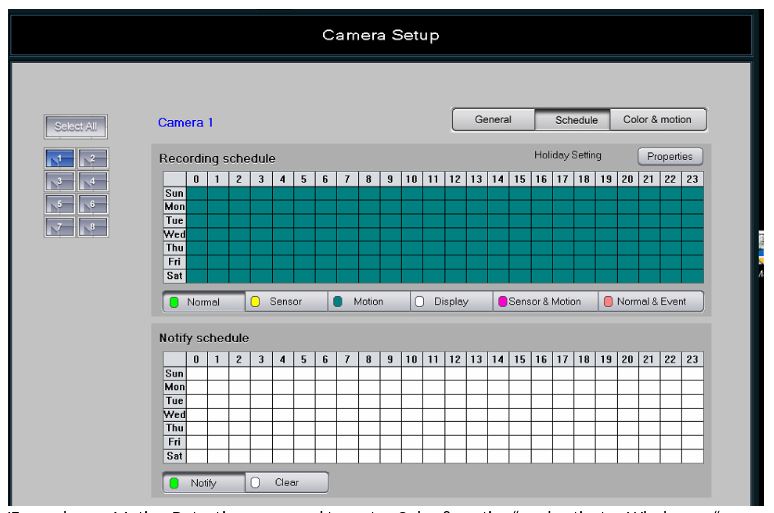
You can choose between Motion and Normal, which means either motion detected recording or continous recording.
IF you choose Motion Detection, you need to go to „Color & motion“ and activate „Whole area“ as well as „Detective motion – Notification“. Dont forget to click on „Apply“ and „Save & close“.

There is very important, that you activate the EVENT NOTIFY Method checkmark
19. After closing, you can setup other users in the „User admin“ tab.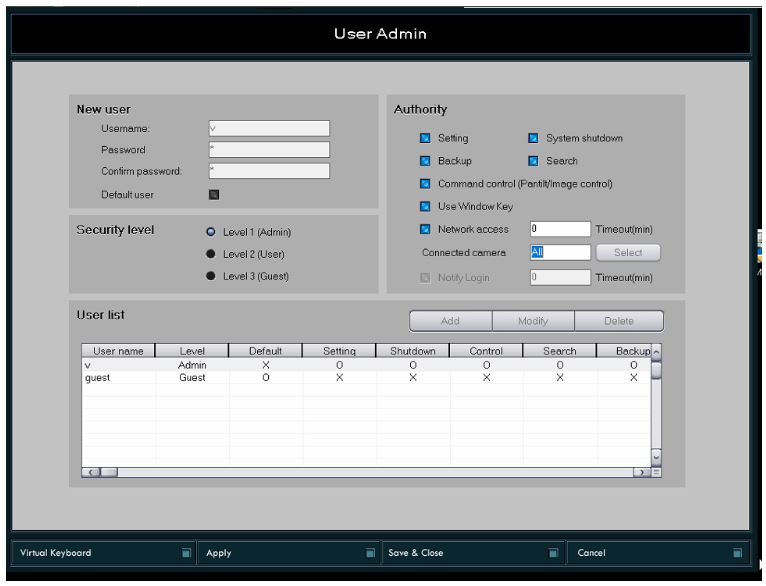
If you want to add a new user, click in an empty field and type in ur login credentials. When done, clik on „Add“.To edit a user, click on „Modify“ after you clicked on the user you want to modify.
